.png)

Other software — Blender, Unity, Unreal, etc. — accept a wide range of file formats that can be used to import and export files.
You can use Poser along with these other programs if you know how to export compatible file formats, like FBX, OBJ and COLLADA, among others. Once you master Poser's file exporting system, you can create game or animation assets in Poser for use in those other programs.
But before you try it yourself, here are a few things you need to know.
Exporting Files
First, you'll need to know how to export to a 3D format.
Poser allows you to export 3D objects in different file formats by selecting File > Export > Format, where "format" is a compatible file type.
In the dialog that appears, check the appropriate radio button to export either a still (at the current frame of your animation) or an animation. If you select to export an animation, enter the frame starting and ending numbers in the appropriate text boxes and click OK.
Then, select the actor(s) you want to export in the following dialog and click OK.
Finally, a standard Save As dialog will appear, allowing you to select your desired filename and path.
Finally, click Save.
Exporting OBJ Files
When you export a 3D object in as an OBJ file, the Export Options dialog presents several options. You'll be asked to make a series of choices.
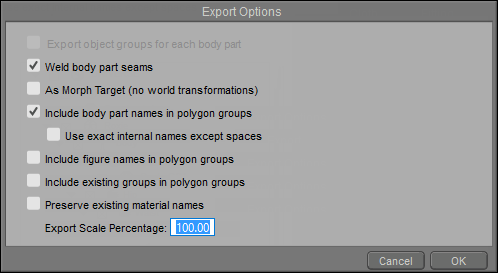
A few examples of the options you'll need to select from are:
- Weld body part seams: When checked, welds groups together where one body part meets another, and discards the duplicate set of vertices. The vertex order of the exported OBJ will be different than the one that was originally loaded into the scene.
- As Morph Target (no world transformations): When checked, this option automatically selects the following two options. Check this option to ensure that the OBJ is exported in its default pose and position.
- Export Scale Percentage: By default, objects will be exported at 100% Poser scale. Many external 3D modelers require that you scale the model up. Depending on the modeler you use, typical scaling factors scale Poser models up by ten times (1,000%) or 100 times (10,000%) for sufficient resolution. Enter the desired scaling factor in the field provided.
Pro Tip
Poser Scale A Poser model that has been scaled up for use in external modelers will have to be scaled back to Poser size upon reimporting it. For models that are exported from Poser at 1,000% (10 times original size), scale it down to 10% on reimport into Poser. For models that are exported from Poser at 10,000% (100 times original size), scale down to 1% on reimport into Poser.
Exporting COLLADA Files
COLLADA offers increased flexibility by allowing to export a more comprehensive representation of your Poser scene.
For example, as a game designer, you might want to import your scene exported from Poser as COLLADA file into 3ds Max. You can work on your scene in those applications, and then transfer it to your game engine with COLLADA. Your scene remains editable at any position in the pipeline.
COLLADA is a feature-rich format that can store various aspects of your scene, thereby preserving a maximum of information upon export. Provided that the application you are exporting for supports those features, you can choose to transfer data such as static figures, props, baked morph targets, cameras, and lights.
As a note, Poser currently supports export of COLLADA 1.4. COLLADA 1.5 is not yet supported.
COLLADA File Dialog Boxes


To export a COLLADA file:
- From the Main Menu select File > Export > COLLADA|RWY.
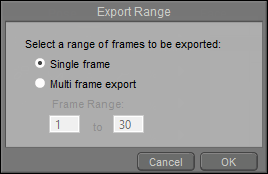
- The Export Range dialog appears. If you want to export only the current frame, choose Single Frame. To export multiple frames in an animation, choose Multi frame export, and then enter the range of frames to be exported.
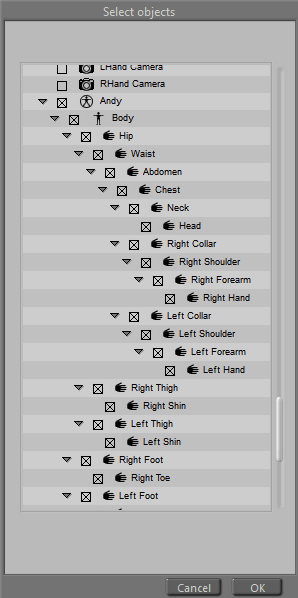
- The Select Objects dialog appears. By default, the lights, main camera, and all figures and props in your scene are selected for export. You can uncheck objects you don’t want to include, and check other objects that you do want to include. After you make your selections, click OK to continue.
Choose the objects to export from your scene.
If subdivision is set on any of the objects in your scene, Poser will warn you that subdivision will be turned off for the COLLADA export. Click Cancel to return to Poser, or OK to continue. - Click OK to continue. The Export Options dialog appears. Enable the appropriate Export Options and click OK. A full explanation of each option can be found under Exporting COLLADA Files in the Poser manual.
- Click OK to choose a folder and enter a filename for your export. Then click Save to save the file.
Pro Tip
When exporting from Poser to 3D software that supports COLLADA, you can export using Poser’s default skinning method, or a single mesh with weight maps. For more information on these options, see Skinning Methods.
Exporting FBX Files
The File > Export > FBX command allows you to export FBX files to third party applications like Autodesk programs, Blender, Sketchup, Maxon, Unity and Unreal. You even have the option of including rigging, morphs, animation, and textures.

To export an FBX file, follow these steps:
- Choose File > Export > FBX. The Export Range dialog appears.
- Do one of the following:
- To export only the current frame, choose Single Frame, or
- To export more than one frame, choose Multi Frame Export, and then enter the desired frame range in the number fields.
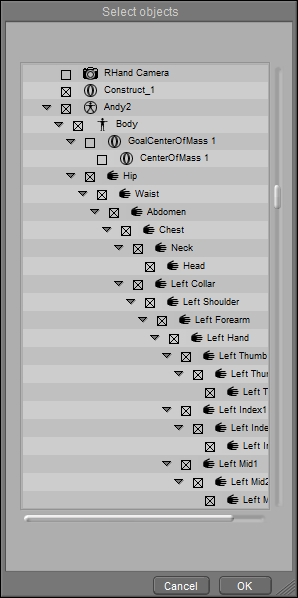
- Click OK to continue. The Select Objects dialog prompts you to select the items that you want to export. By default, the main camera and all scene objects are selected. To choose specific items, uncheck the Universe item at the top of the list, or click the Select None button. This will deselect all objects. Then check each individual item that you want to include.
- Click OK to continue. The FBX Export Options dialog appears with the following options:
If subdivision is set on any of the objects in your scene, Poser will warn you that subdivision will be turned off for the FBX export. Click Cancel to return to Poser, or OK to continue.
After selecting all of your export options, choose OK. The Export as FBX window prompts you to choose a folder and assign a filename.
Click Save to save the FBX file.
Pro Tip
Higher settings prevent obvious seam lines. If you find later that there are visible seams in your external application, you can increase the Border Pixel Size setting and export the FBX file again.
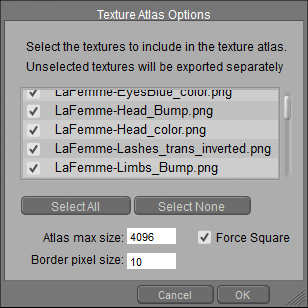
A note about Texture Atlas Options
When the Compile Texture Atlas option is checked during FBX export (as described in FBX Export Settings and Steps), Poser will combine individual texture maps into as few images as possible, based on the settings that you specify in the Texture Atlas Options dialog.
Multiple images may be generated, such as when multiple textures are bound to the same UV space (for example, when diffuse, transparency, and bump maps are used in the same UV space). The above image shows thumbnails for a texture atlas that is created for La Femme. Notice that two images are created, with the bump maps for the skin textures being placed on a second texture.


