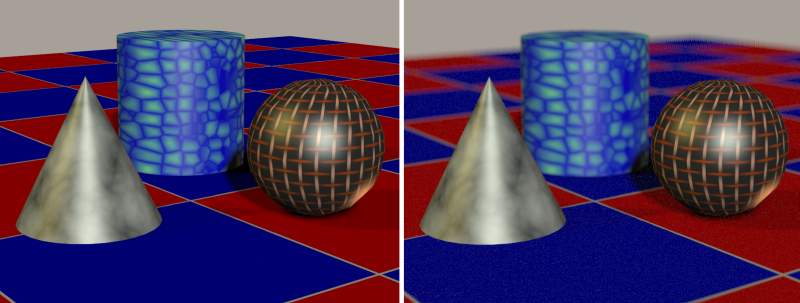
Depth of Field is one of the most important tools in an artist's chest. Using it correctly in photorealistic renders can take your art to the next level.
You can direct the viewer's eye and increase impact by knowing how to make the parts of your image you want sharp and the parts you want to be out of focus. Using a shallow depth of field will make your subject stand out from the background. Or use a wide angle and a high F-Stop you will be able to adjust your depth of field to get more of your scene in focus.
What is 'Depth of Field?'
Taken from photography, "Depth of Field" is the distance between the nearest and the farthest objects that are in focus in an image. The farther away items are from the focal plane, the more blurred they will appear in the image. Depth of field may be used for technical or artistic purposes by forcing the viewer to focus on a particular point in the image.
In photography, the depth of field can be calculated based on focal length, distance to subject, the acceptable circle of confusion size, and aperture. Because cameras that can only focus on one object distance at a time, depth of field is the distance between the nearest and the farthest objects that are in focus.
In Poser, an image can be rendered with the entire perspective in focus or selected areas using Depth of Field.

Pro Tip: How to determine if DOF is enabled
To Query whether depth of field is enabled, use the Syntax: DepthOfField(). A return value of 1 indicates that depth of field is enabled; a return value of 0 indicates that depth of field is disabled.
How to enable Depth of Field
To enable Depth of Field, go into the Render Settings and check the Depth of Field option. Poser's render engines, FireFly and SuperFly, have independent controls for Depth of Field. Make sure to enable DOF depending on which engine you intend to use.
Enabling DOF allows for a widening of the lens aperture that achieves a Depth of Field effect.
Which Parameters to know for DOF
To achieve Depth of Field, you must adjust a few camera parameters to control the behavior of the selected camera. These parameters are:
-
Focal: The Focal parameter dial sets the camera’s focal length. Smaller numbers give wider angles and will add more stretching and distortion as they decrease. Larger numbers give results like telephoto lenses, and result in less distorted but flatter images.
-
Perspective: The Perspective parameter shifts the current camera’s perspective without changing the camera’s location. This can give the illusion that the camera is farther or nearer to objects in your scene. The Perspective setting is hidden, because it is interconnected with the Focal setting. If you adjust the Perspective dial, you will see a change in the Focal setting.
-
Depth of Field: Depth of Field can be individually configured for each camera. In SuperFly, the quality of the depth of field is controlled by the Pixel Samples setting.
-
Focus Distance: The focus distance dial controls the cross hair so that you can position the focus. Place the cross hair at the distance at which objects appear most in focus. In Poser, focal distance for each camera is determined by a control object located within the scene. You can animate the control object like any other figure in Poser, by using keyframes to specify its change in position; Poser will interpolate the movement between keyframes for you. (For more information about animating using keyframes, please refer to Animating with Poser.) Enter your desired value in the camera’s Focus Distance field.
-
F-Stop: Taken from photography, the F-Stop number represents a lens aperture size, which operates inversely. The larger the number, the smaller the aperture opening. Each change either doubles or halves the amount of light transmitted by the lens to the film plane.
On a physical camera, this represents the lens focal length divided by the F-stop value to determine the actual aperture size. The F-Stop setting affects the depth of field in Poser, just as it would in a real camera lens. Smaller F-stops increase depth of field and narrow the point of focus. Focus on the subject, and then enter the desired value in the F-Stop field. In short, the smaller the number the more "fuzzy" objects not in focus will be and blend into the background of an image.
Show us how you used Depth of Field on Twitter or Facebook using the hashtag #CreateWithPoser.
.png)


