.png)
Composition in Poser 14 for Graphic Novels
Creating a graphic novel is a blend of storytelling, visual design, and emotional clarity. Poser 14 is genuinely one of the easiest tools to use when you want to design strong, intentional comic panels, because it gives you the same kinds of controls a cinematographer or storyboard artist relies on — but in a way that’s approachable and playful rather than overwhelming. When you treat Poser as your “virtual set,” it becomes a powerful engine for shaping pacing, mood, and visual storytelling.
The Power of Composition in Visual Storytelling
Composition is the silent narrator of every graphic novel. Long before a reader reaches the dialogue, the framing of a panel has already communicated tone, tension, and character dynamics. Poser 14 gives you the precision needed to shape these impressions through camera placement, focal length, depth of field, and the positioning of your characters within the frame. Even subtle adjustments—like shifting a character’s eye‑line or refining their silhouette—can dramatically alter the emotional meaning of a moment.
For example, a low‑angle shot of a character standing in a doorway can instantly convey power or intimidation, while a close‑up with a shallow depth of field can highlight an emotional nuance. These choices guide the reader’s eye and set the tone for each moment. A wide, symmetrical shot of a deserted room can evoke loneliness, grandeur, or even foreboding. Composition is never just about aesthetics; it’s about guiding the reader’s emotional experience from panel to panel.
Building a Camera Workflow That Serves the Story
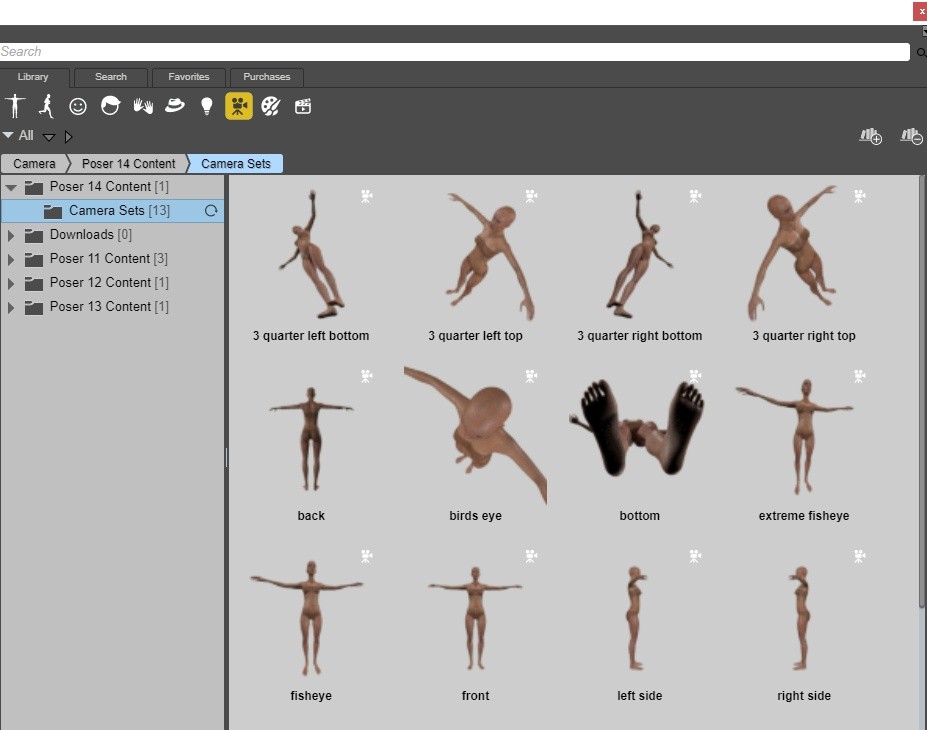
One of the most effective habits you can develop in Poser 14 is saving a camera preset for each panel. This allows you to lock in framing and return to it later without losing your setup so it remains consistent even as you refine poses, adjust lighting, or modify props. It also allows you to revisit earlier panels without losing the exact angle or mood you originally established. Some camera presets are already included to give you a starting point.
Creating a graphic novel is a blend of storytelling, visual design, and emotional clarity. Poser 14 is genuinely one of the easiest tools to use when you want to design strong, intentional comic panels, because it gives you the same kinds of controls a cinematographer or storyboard artist relies on — but in a way that’s approachable and playful rather than overwhelming. When you treat Poser as your “virtual set,” it becomes a powerful engine for shaping pacing, mood, and visual storytelling.
The Power of Composition in Visual Storytelling
Composition is the silent narrator of every graphic novel. Long before a reader reaches the dialogue, the framing of a panel has already communicated tone, tension, and character dynamics. Poser 14 gives you the precision needed to shape these impressions through camera placement, focal length, depth of field, and the positioning of your characters within the frame. Even subtle adjustments—like shifting a character’s eye‑line or refining their silhouette—can dramatically alter the emotional meaning of a moment.
For example, a low‑angle shot of a character standing in a doorway can instantly convey power or intimidation, while a close‑up with a shallow depth of field can highlight an emotional nuance. These choices guide the reader’s eye and set the tone for each moment. A wide, symmetrical shot of a deserted room can evoke loneliness, grandeur, or even foreboding. Composition is never just about aesthetics; it’s about guiding the reader’s emotional experience from panel to panel.
Building a Camera Workflow That Serves the Story
One of the most effective habits you can develop in Poser 14 is saving a camera preset for each panel. This allows you to lock in framing and return to it later without losing your setup so it remains consistent even as you refine poses, adjust lighting, or modify props. It also allows you to revisit earlier panels without losing the exact angle or mood you originally established. Some camera presets are already included to give you a starting point.
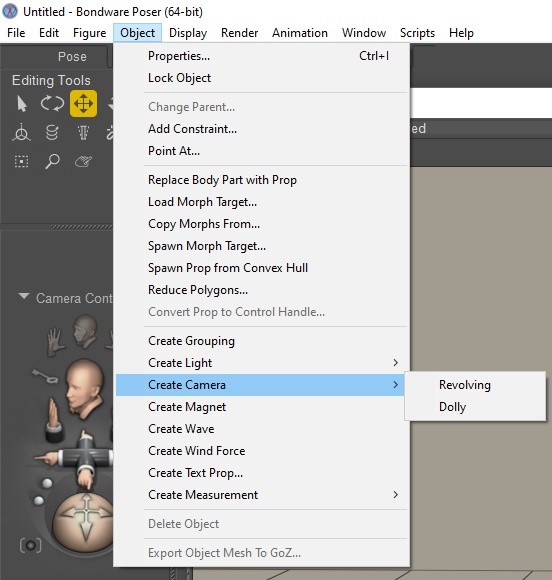
You can create dedicated cameras for your scenes - just choose the type of camera you want to create by selecting either Revolving or Dolly from the Create Camera sub menu.
A revolving camera orbits around the center of the Poser workspace, regardless of where objects are placed in the scene. A dolly camera, on the other hand, rotates around its own center and can move freely through the environment, allowing you to navigate around and between elements within the scene.
Using a simple naming convention—such as Page03_PanelB_Cam—will keep your project organized, especially when working on multi‑page sequences. Imagine a conversation scene that spans six panels: by assigning a camera to each panel, you can maintain consistent angles while still adjusting expressions, gestures, or lighting as the dialogue progresses.
Shaping Panels Through Aspect Ratio
Even in digital‑only comics, aspect ratio plays a crucial role in shaping the rhythm and pacing of a page. Each panel controls what the reader sees, how long the moment feels, and how the story flows from one beat to the next. A narrow vertical panel can feel tense or dramatic and emphasizes height and scale. Wide horizontal panels can feel calm, expansive, or epic. Consider using these for sweeping landscapes, chase sequences, or quiet emotional pauses. A square panel, by contrast, can create intimacy by focusing the reader’s attention on a single subject.
More stylized choices can also elevate your storytelling. A slight Dutch angle can introduce tension or disorientation during a confrontation. Moving the camera along a path before locking in your final angle can help you discover more dynamic compositions. These techniques bring a sense of motion and intention to your panels, even though the images themselves are static.
Thinking Cinematically to Strengthen Your Narrative
Film language is a rich resource for graphic novel artists, and Poser 14 makes it easy to explore cinematic techniques. An establishing shot can introduce a futuristic city, a forest clearing, or a starship hangar, grounding the reader in the setting. Medium shots are ideal for conversations, capturing gestures, posture, and subtle emotional cues. Close‑ups and extreme close‑ups heighten intensity, whether you’re focusing on widening eyes, expressive hands, or a symbolic object that carries narrative weight.
Posing Characters With Emotional Precision
Poser’s posing tools allow you to refine body language in ways that support your story. Small adjustments can make a big difference: a slight slump in the shoulders can convey defeat, while a raised eyebrow can add humor or skepticism. For example, in a confrontation scene, angling a character’s torso forward and tightening their fists can heighten the sense of conflict. Poser 14’s posing controls make these adjustments intuitive, even for beginners, helping your characters feel expressive and alive.
Action scenes benefit from the same attention to detail. Twisting the torso creates dynamic lines of motion. Angling the hips and shoulders prevents characters from looking stiff or symmetrical. Even the placement of the feet can reveal intention—characters rarely stand flat when they’re bracing for impact or preparing to strike. With Poser 14 it's easy to make these micro‑adjustments, helping your characters feel expressive and alive.
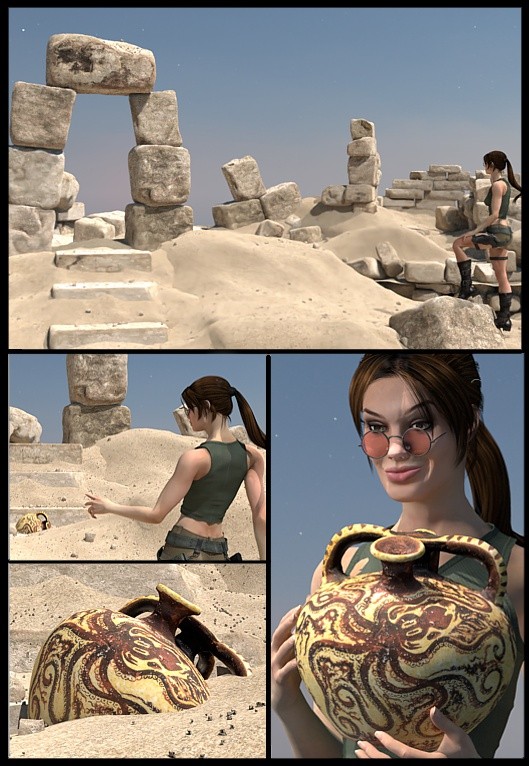
Bringing It All Together - Example
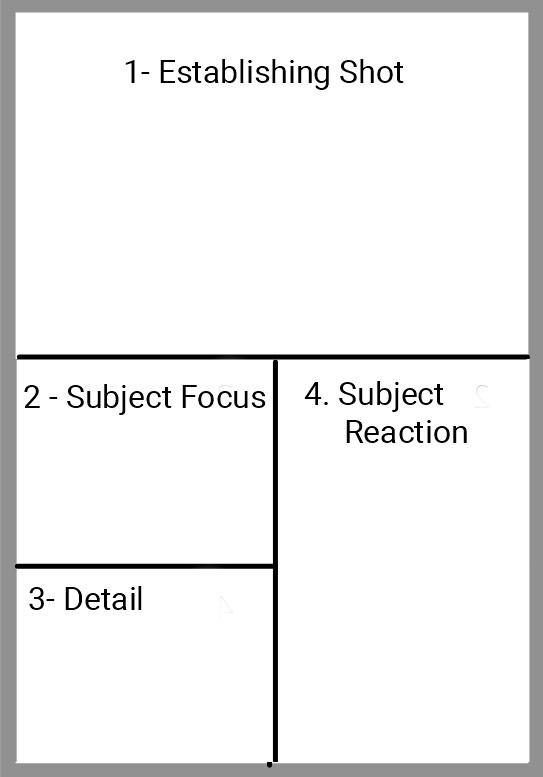
Our first panel will be the establishing shot and the aspect ratio used here is a wide cinematic one because wide frames are perfect for environment‑heavy establishing shots. They give breathing room, show scale, and set the tone.
A high‑angle camera also works best for this.
Moving on to the second panel we can focus on our subject with a classic balanced storytelling frame. This enables us to keep the character centered while still showing enough environment to maintain context.
The third panel can hone in on a detail to maintain reader interest and create anticipation. We might see a close-up of an object such as a symbol or rune. The camera can be moved in close and using shallow depth of field detail can be isolated.
Finally, in the fourth panel we have our subject's reaction in a vertical portrait. A head-and-shoulders shot is enough to convey emotion as the focus will be on the face - a light tilting angle making for more tension if necessary.
When you combine thoughtful camera work, clear posing, and an understanding of visual storytelling, your panels begin to carry emotional weight. Poser 14 gives you the tools to experiment, revise, and refine until each moment communicates exactly what you intend. As you grow more comfortable with these tools, you’ll find your pages becoming more cohesive, more intentional, and far more engaging for your readers.
Stay tuned as we get into Visual Styles for your Graphic Novel coming up next!